This post explores a lab I produced on large language model training and how I used Claude Code to help generate the lab.
Introducing the Model Fine-Tuning Lab
This semester, I’m a tutor (USA equivalent: Teaching Assistant) for a new unit at the University of Sydney – INFO4994: AI Literacy and Competency. Halfway through the semester, I was invited to prepare an interactive lab with the objective of getting the students to have some hands-on experience with model fine-tuning. The practical element of the lab involves students playing with GPT-2 by running code chunks in Python. Importantly, the lab DOES NOT assume students know how to code. Instead, students will be running parts of a Python Jupyter file using Google Colab (which requires minimal setup). Think of a Jupyter file as a digital notebook that contains chunks of code that students can run, intertwined with text blocks that explain what the code does and what activities students should complete. This way, all students have to do is make minor changes to modify the code (such as updating the prompt given to the model, or specifying new fine-tuning training data), meaning it is completely accessible for those who have never used Python before.
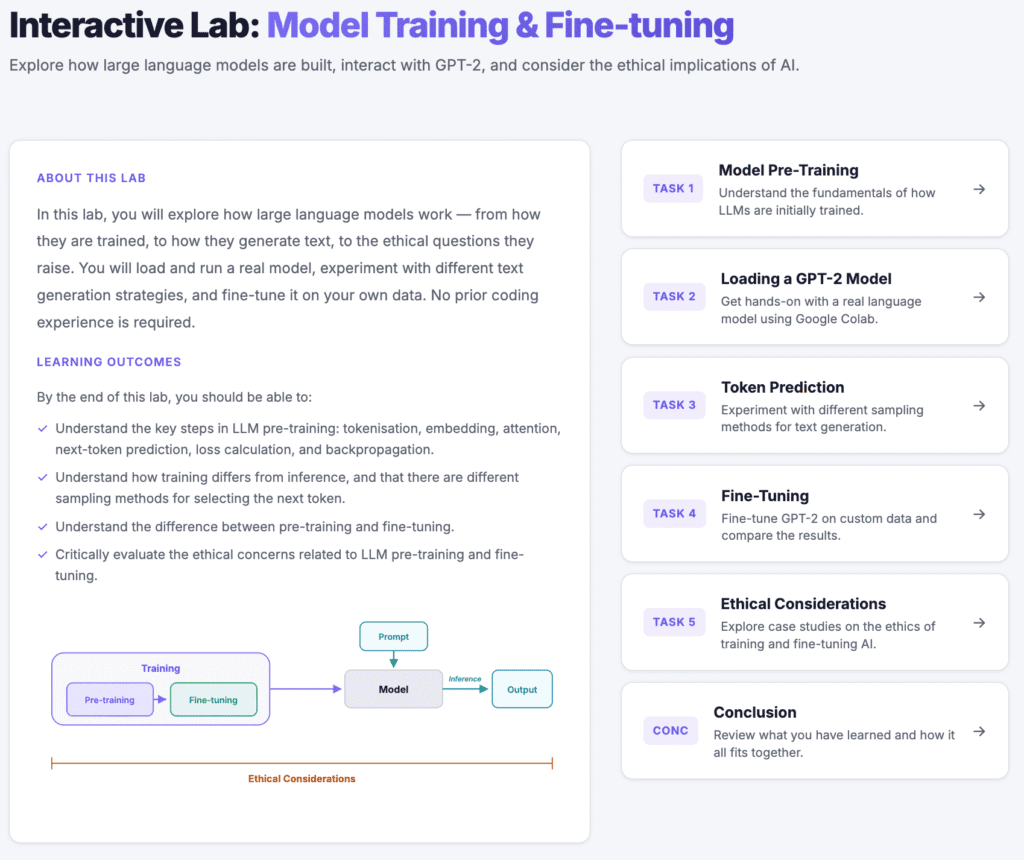
For the lab, I made a static HTML site for students to visit, with five tasks for students to complete primarily in groups. The lab can be found here (GitHub source code here). As a quick summary of the lab (and the relevant learning outcomes), students have five tasks:
- Task 1: Model Pre-Training.
- Relevant learning outcome: Understand the key steps in LLM pre-training: tokenisation, embedding, attention, next-token prediction, loss calculation, and backpropagation.
- Task 2: Loading a GPT-2 Model.
- In this task, students are given a quick introduction to Google Colab before uploading a provided Python Jupyter notebook. Students are then instructed to run some code chunks to load the publicly available GPT-2 model.
- Task 3: Token Prediction.
- In this task, students experiment with the different sampling methods that models can use to predict the next token. The emphasis is on getting students to experiment with different prompts and next-token sampling methods in order for students to hypothesise how the sampling methods are working.
- Relevant learning outcome: Understand how training differs from inference, and that there are different sampling methods for selecting the next token.
- Task 4: Fine-Tuning.
- In this task, students fine-tune a GPT2 model. They are given some examples of fine-tuning before they commence, so that they have an idea of what might work, and what is too complex for GPT-2.
- Relevant learning outcome: Understand the difference between pre-training and fine-tuning.
- Task 5: Ethical Considerations
- The lab ends with students choosing one of four case studies on different ethical issues that relate to large language model training. Students will engage in group discussion questions to explore their chosen issue.
- Relevant learning outcome: Critically evaluate the ethical concerns related to LLM pre-training and fine-tuning.
For those who are interested, I also gave a lecture on this lab to prepare students ahead of time. The recording can be found below:
Now, my main purpose in writing this post is not to share this lab, although I do hope that people find it useful. I really wanted to share how I used generative AI (genAI) to help me in creating the lab. Recently, my research lab purchased a Calude for Teams plan, and I’ve been experimenting with Claude Code. I wanted to explore my work process in creating this lab using genAI as a tool. Through this process, I very much viewed myself as the conductor, and didn’t blindly let Claude create the entire site on its own without my direction. I hope that other educators will find my experience useful.
Leveraging AI in Creating the Lab
Below, I’m going to explore the general steps that I followed. This is not going to read as a detailed step-by-step guide that can be used to create the exact same learning lesson as I did. That would be an incredibly boring and long read! In reality, even with AI, it took me hours to create this lab. I used AI through an iterative process, and I want to explain the general approaches I used as part of the content generation cycle.
I also want to stress that what I write below is my current approach to creating a lesson. I’m sure there are many different ways that people will go about doing this. That being said, I believe (and hope) that the content of this post will help those who have never tried something like this before, and I also believe the skills can be easily transferred to any genAI tool.
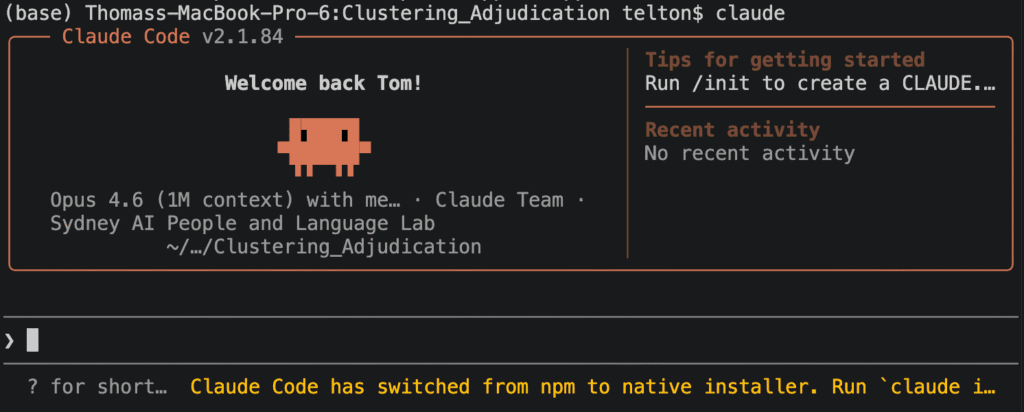
Introduction to Claude Code
What is Claude Code? Claude Code is a genAI tool that excels in coding tasks. It is slightly different to the chat-based genAI tools that most people will be familiar with, where you write your prompts online with the AI sending output – typically text-based – back. Instead, you download Claude Code to your computer and run it through a terminal. The cool thing about Claude Code is that you can ask it to complete tasks, and it will write code for you on your device. This is particularly useful when coding, because it means you can get Calude to do tasks, check whether you agree with the operation it is about to perform, and make your own modifications. Claude has direct access to the files you give it permission to see, so it has up-to-date context, improving the likelihood of useful answers.
The ability to quickly generate written content on my laptop was a key reason I used Claude Code for this project! The lab site that I created is an HTML file, and so Claude would be creating and modifying these files at my request. I find this a much more effective set-up than using a web-based chatbot that does not specialise in creating websites or applications. For example, if I were to use ChatGPT on the web, I’d have to give it my prompt asking it to make the lab, then download it to my computer to run it, then ask it to make changes, re-download what it produces, etc. I’m not saying that ChatGPT can’t be used – it is still great! However, for a large project like this, I believe Claude Code and similar tools are far superior.
Another point worth mentioning is that Claude Code comes with different models that you can switch between. The two I utilised were the Sonnet and Opus models, with the Opus model being the most powerful of the two. You may be wondering – if Opus is so powerful, why not use it every time? The reason is that Claude Code has usage limits that vary by the plan you are on. Hence, if you are worried about running out of usage, you should restrict Opus for complicated tasks that require planning and Sonnet for simpler tasks.
The First Prompt
Before doing anything with genAI, the most important thing is to make sure that it has enough context to achieve whatever you want. It’s up to you to decide how much context to provide based on your goals. For example, for this lab, I had very clear specifications of what I wanted it to produce. If I were to simply say to Claude code, “generate a lab on model fine-tuning with tasks for students to complete, with embedded group discussion questions”, it could go in heaps of directions, and would almost certainly not produce what I’m after. Hence, to start off with, I produced a file on my computer called “Lesson_plan.md” which included:
- A “Summary” section explaining the high-level motivation of the lab, including context about the student’s academic background. The summary section also included bullet points of directives for Claude Code to follow, such as that the site it will produce should be a static HTML site that can be deployed to GitHub pages.
- A “Lab Content” section explaining the format of the site.
- The sub-headings “Home”, “Task 2: Loading a GPT2 Model”, “Task 3: Ethical Considerations”, “Task 4: Token Prediction”, “Task 5: Fine-tuning”, with information explaining what goes in each section, and which group-discussion questions the students will have to answer.
The entire file can be found here.
Of particular mention are the following directives, which I also provided in Lesson_plan.md:
- I will NOT ask you to generate the entire lab at one time. Instead, I will instruct you to implement different components of the lab.
- If at any point you are unsure or think there is ambiguity about what to do next, ask clarifying questions.
The first point is important because I want the AI to incrementally build the lesson. For example, I want to see the general page layout that the AI designs for the site before it starts adding content. This forms the basis of my iterative generation process. I will iteratively prompt on the current task before moving on to the next one. The second point is important because it was important to me that it stuck to the brief I provided in the file. If it was confused, I wanted it to ask rather than ‘creatively’ acting on its own.
With the file provided, it was time for the first prompt. I set the model to Opus (the powerful one), and set the prompt:
You are going to be using the content in Lesson_plan.md to make a lesson plan. You will be creating it in stages, and I will explicitly tell you what stage to make when. The first thing I want you to make is the front end skeleton for the entire lesson. Do not place content yet, but focus on navigation and ensuring the theme fits my requriements. Always write code as you think.
Why did I say, “Always write code as you think”? In a previous experiment using Claude Code, I found that it was thinking about what solution to make, and then I received an error that it had exceeded its token limit for the current message. What I believe happened was that it was storing the solution in its metaphorical mind, and not putting pen to paper. I wanted it to be continuously offloading snippets of code as it thought, rather than waiting until the end to write the entire solution.
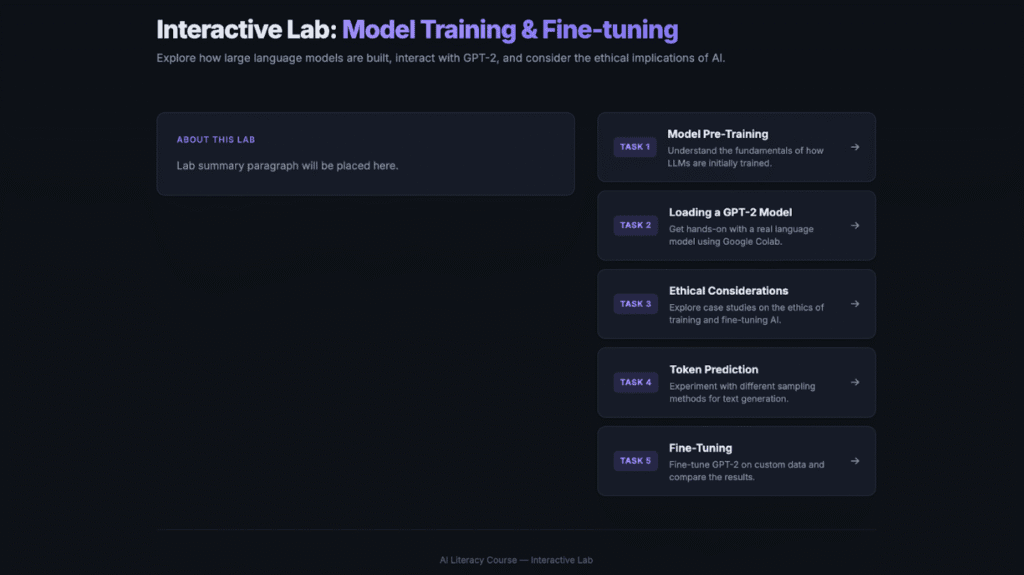
After running this prompt, it generated some output. Before moving on to the next part of the lesson I would like to implement, I would iteratively prompt the AI until the layout matched what I was after. For example, my iterative prompts included:
I’m not a fan of the layout and style. Ca[n] you use darker colours? Also, on the home page, I want the tasks on top of eachother, and the paragraph to the left of the task buttons.
Looking good. I want you to remove the top navigation bar. Also, the about this lab box should be wider and take up more of the screen. It doesn’t have to be so narrow.
I realise this example of iterative prompting is very specific to this task of generating the layout for my lesson. However, the iterative prompting is such an important part of human-in-the-loop AI development. I am the conductor, and the AI is the tool. These are my ideas, and the AI is executing them.
Iteratively Building a Task For Students
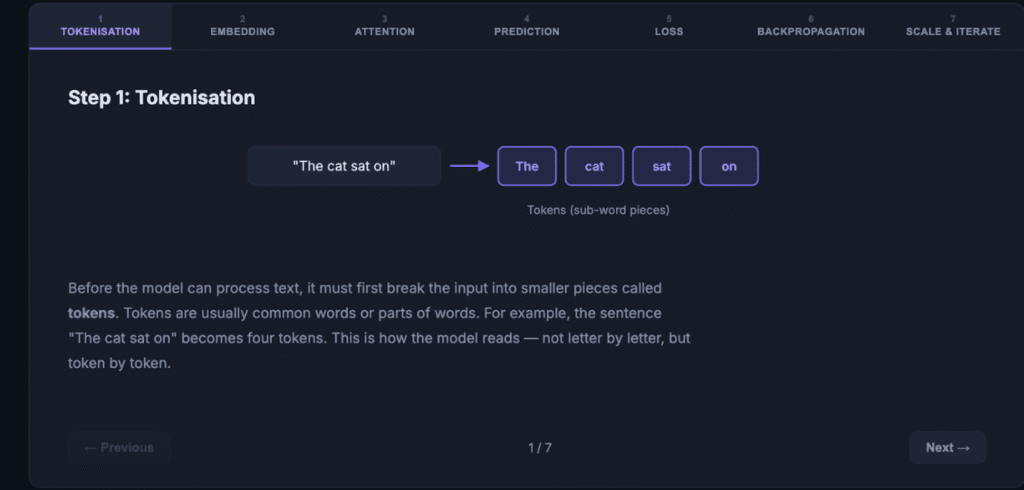
In the lesson, there are five tasks for students to complete. Here, I want to explain my general approach for producing the content that goes with each task. As an example, let’s look at task 1. In task 1, we do a recap of how model pre-training works for large language models. There are many steps involved, and so I wanted to provide students with a graphical explanation.
In Lesson_plan.md, I explain the visualisation that I’m after. Here is the relevant excerpt:
Step 2: Produce an interactive visualisation/diagram illustrating the important steps in model pre-training. This can include multiple slides that students click through. The important steps that must be included: tokenisation, embedding, attention, next-token prediction, loss calculation, backpropagation, scaling and iteration (indicating how the process is repeated billions of times to make the model better and better). Ensure that the explanations are accessible, and they should not go into complex detail.
Hence, I prompted Claude Code to make the visualisation. I did this by explaining what part of Lesson_plan.md it should implement:
Now make the visualisation in task 1 step 2.
My rationale for asking it to create the visualisation independently from the rest of the content in task 1 is that it is quite an involved process, and I wanted to make sure the visualisation was correct before generating the rest of the task. This is a screenshot of what it produced:
The individual steps were fine, but I actually wanted the visualisation to build so that students could see how each step fed into the next (after all, a model has each step passing into the next). Hence, I used the aforementioned iterative process. I next prompted it:
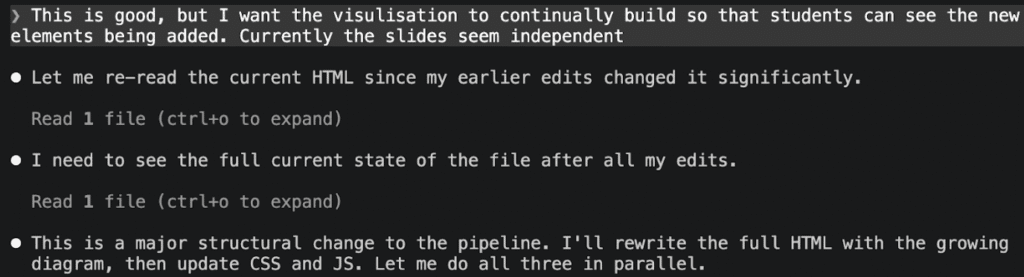
This is good, but I want the visulisation to continually build so that students can see the new elements being added. Currently the slides seem independent
Below is some of Claude Code’s output after my prompt. To the right of the circles is some text explaining to me what Claude Code is currently doing. In the last section, we see that Claude is communicating that to meet my request, a substantial change is needed. This is another reason why I prefer to only focus on small parts of the lesson at a time. I want the big restructures to be as minimal as possible. A large restructuring can become much more complicated if there is a lot of other content to manage.
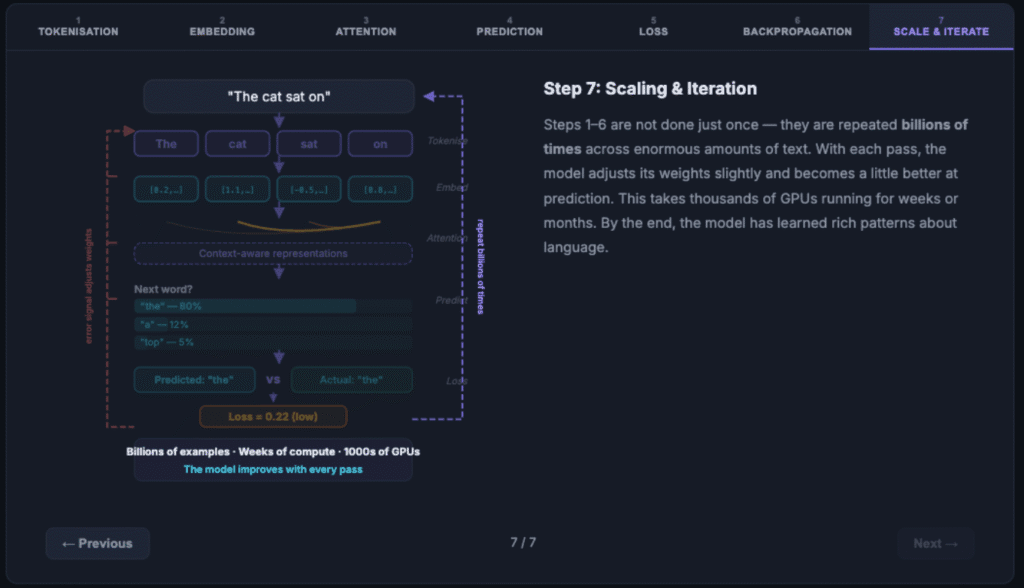
After this, it produced a visualisation that was aligned with what I was after:
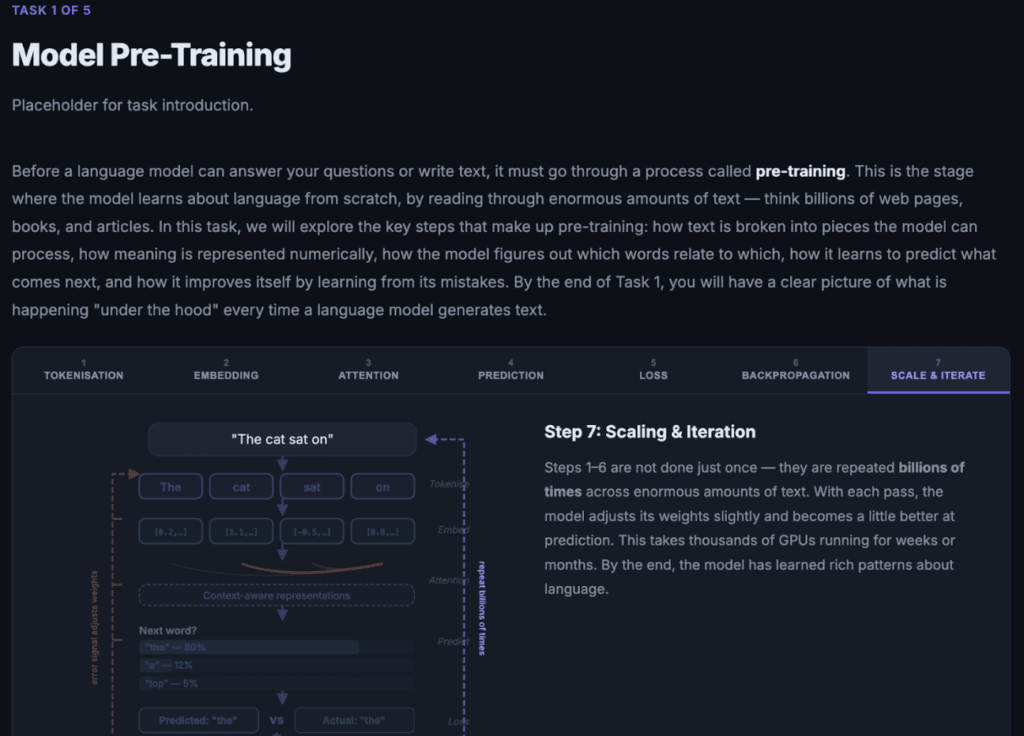
Up to this point, only the visualisation (with side-by-side text) was created. The surrounding paragraphs (such as the introduction) and the discussion questions needed to be added. This could be quickly accomplished with a simple prompt:
Now complete the paragraphs in step 1 and step 3 in task 1, as well as the discussion questions in task 1.
It is important to note that this prompt makes sense to the AI because of the context provided in Lesson_plan.md. Ensuring the AI has clear and thorough context makes such a big difference and ensures that what is generated is highly aligned with what you want to implement. Here is what the lesson looks like after Claude finished running the prompt:
Summarising External Content
In task 5 of the lesson, we expose students to ethical considerations for model fine-tuning. To do this, I wanted to substantiate the case studies by summarising selected articles online. Hence, I wrote a prompt to explain what content to include. Here is a partial sample with some reformatting and minor changes:
I want you to implement task 5. In task 5, we have the case studies. I want you to use the following articles and videos for the case studies. Do not process the YouTube videos yourself – I’ll tell you what the main points are. You should read the articles to help you with your summary. When writing your summaries, remember that the point is to stimulate discussion for students (who will do the group discussion questions).
For each case study (unless otherwise directed), do the following: 1. A summary of the issue that is general and accessible to people without technical experience. 2. A quick summary of the article I give you and the main points. 3. Before telling students to watch the video, provide them with a quick 1-2 sentence summary by synthesising the points I give you. Then embed the YouTube video below in it’s own frame.
Case study 1: Environmental Impact
Article to include: [9 News Article]
YouTube video link: [Youtube Video]
YouTube video key points: – The video explores the large water requirements in data centres (where AI models operate), as well as the large energy costs. – A company in the video is using hydrogen-based solutions, which is significant because the energy production creates water as a by-product.
While Claude Code is able to fetch articles from online, it failed to reach the articles I specified:
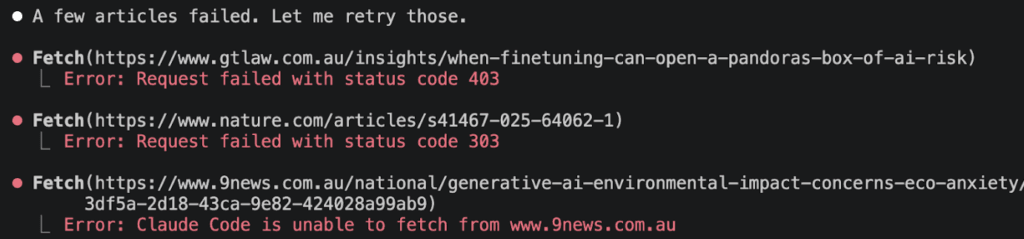
One possible reason it failed is that some websites restrict automated AI crawlers or other bot traffic. This has become increasingly common as companies try to limit large-scale scraping and AI dataset collection. In my case, however, the use is quite different from mass data collection. I am using the articles to generate concise summaries for an educational resource. I manually reviewed the articles first to ensure they were appropriate. The summaries are written in original wording rather than copied from the source, and the original articles are properly attributed and linked within the resource.
So, to ensure that Claude still had access to these few websites, I manually downloaded the web pages and placed them in the directory that Claude has access to:
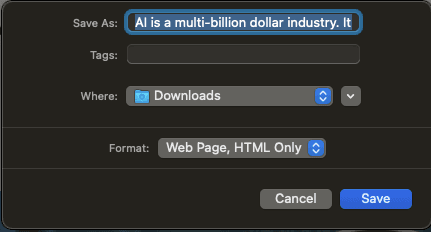
This resulted in the summaries I was after!
Conclusion
This post was never intended to be an exhaustive tutorial on how to make the exact same fine-tuning lab that I created for the AI literacy course. Instead, the idea was to emphasise the skills and processes I employed to create the lesson. I think that these skills are easy to apply and incredibly transferable.
The thing I want to emphasise is that the AI is not a replacement for educational design. I firmly believe that teachers should stay at the centre of the design process. Even if AI were an expert on learning theories, there are so many differences in each classroom’s context (such as the nature of the students, what interests them, and whether they are more extroverted or introverted) that the teacher should still be in control. The teacher should be the conductor, the person in charge. The AI should be the helper and thinking partner, not a replacement. As humans, we have a ‘gut feeling’ about how things will go, something the AI can’t replicate.
Although AI development is moving so fast, I have little doubt that the tips in this article will stay useful for the foreseeable future (and I would argue, forever). In this article, one of the key tips is about the importance of context. Context is vital, and you must provide whatever AI tool you’re using with as much context as necessary to create the output you desire. In addition, interacting with AI is an iterative process, and you should be prepared for a long conversation of back-and-forth refinement as you develop your ideas.
AI Usage Disclaimer
Obviously, Generative AI (mostly Claude Code) was extensively used to create the AI training lab.
For this blog post, Grammarly was used to improve grammar and sentence flow. A paragraph on Claude Code failing to reach the specified websites was generated using ChatGPT, yet the first draft was written by me.
The thumbnail photo for this blog post was created using Gemini Nano Banana 2.
Acknowledgments
Very grateful to Prof Mary Lou Maher for inviting me to teach this and for her advice on how to improve, as well as the advice from my co-tutors, Tina and Clarissa!